User guide › Apps › Point of Sale
One app, several screens
Point of Sale is a single app. The register, the stock screens and the purchasing screens are all surfaces of that one app — there is no separate "inventory app" or "purchasing app" to install. Installing Point of Sale gives you all of them; who gets to open which one is decided per person.
| Surface | What it's for | Covered in |
|---|---|---|
| Register | Selling: cart, payment, receipt, refunds, the cash drawer. | This page |
| Restaurant mode | Tables, open tabs, kitchen tickets, menu modifiers, QR ordering. | This page |
| Stock | What's on hand, adjustments, stocktakes, transfers, imports. | Stock & warehouse |
| Purchasing | Purchase orders, receiving deliveries, goods receipts, supplier returns. | Purchasing & suppliers |
Sales, stock and purchases are the same set of numbers seen from three angles. If you want the whole picture end to end, read Stock lifecycle.
Before the first sale
Three things have to exist before the register will let anyone check out. If you
open /pos and see No registers yet, this is why.
- A warehouse Under POS → Warehouses. This is the shelf stock comes off — a shop floor, a stockroom, a van. One is enough to start.
- A register bound to that warehouse Under POS → Registers. Warehouse is required: checkout has to know which shelf to decrement. A register can also carry a Code (used in receipt numbers), a Currency, a Default tax rate and network-printer details.
- Products with a price Under POS → Products. Name and Price are what the register reads; SKU and Barcode make searching and scanning work. A product with Active in POS switched off is hidden from the grid.
If a product has no readable price the register refuses to add it and says so by name. Check the Products entity actually has a currency field called Price, and that the product record's Price is filled in.
Opening the register
- Open the register screen POS → Register. The page remembers the terminal you used last time.
- Pick your till The dropdown next to the Point of Sale title lists every register. Pick the one this terminal is.
- Open the drawer The top-right pill reads Drawer closed. Click Open, count the cash you're starting the shift with, enter it as the Opening float, and confirm with Open drawer.
Once open, the pill shows the shift live — Drawer open · N sales · total. You don't strictly have to open a drawer to sell, but without one there's nothing to reconcile at the end of the shift and no expected-cash figure.
Taking a sale
- Build the cart Tap a product tile to add one; tap again to bump the quantity. Or type into Search products by name, SKU, barcode…. Or scan: the field marked Scan barcode (or type and press Enter) takes any USB barcode scanner that behaves as a keyboard — no driver, no setup. Category tabs above the grid narrow it down.
- Fix quantities Each cart line has − and + buttons and an editable number. Clear empties the cart.
- Add the customer (optional) The Customer (optional) box above the cart attaches a name to the sale.
- Choose how they're paying Cash, Card or Mixed. For cash or mixed, type what they handed over into Cash given — Change due works itself out as you type and turns red if the amount is short.
- Check out The big button at the bottom reads Checkout · the total. One press records the sale, takes the stock off the shelf, numbers the receipt and opens the receipt window.
- Next customer Next sale clears everything and puts the cursor back in the barcode field.
The total on screen is the server's own arithmetic, not the browser's — subtotal,
tax and discount are all recalculated when the sale is committed, so the receipt
can't disagree with the books. Receipt numbers run
REGISTERCODE-YYYYMMDD-NNNN and never repeat or skip.
Each checkout carries a one-time key. If the network hiccups and the same checkout arrives twice, the second one returns the first one's receipt instead of ringing a second sale. Impatient double-presses don't double-charge.
Keyboard shortcuts
Faster than the mouse on a busy counter. They're inert while you're typing in a field, so an "F" in the barcode box stays an "F".
| Key | Action |
|---|---|
| F2 | Pay with cash |
| F3 | Pay with card |
| F4 | Mixed payment |
| F5 | Checkout |
| F8 | Park cart |
| F9 | Resume parked |
| F10 | Z report |
| Esc | Clear cart |
| Shift + ? | Show this help |
Receipts and the printer
The receipt window itemises the sale, shows what was tendered and what change is due, and offers Reprint and Next sale.
Pair a thermal receipt printer once — the pill in the top bar reads Pair printer until you do, then Printer ready — and from then on every checkout prints its receipt on its own. Cash and mixed sales also kick the cash drawer open. Reprint runs the same print again; with no printer paired it falls back to the browser's own print dialog, which is fine for an A4 printer or a PDF.
- Email a copy — type an address next to Email receipt to and send. It goes out through your workspace's normal mail setup and confirms with Sent.
- Other browsers — direct USB printing needs Chrome or Edge. Elsewhere the pill reads No printer and window printing still works.
- Shared network printer — for one printer behind several tills, fill in Network printer host and Network printer port on the register record instead of pairing over USB.
A failed print drops the pairing and shows Receipt printer failed. The sale is already recorded — only the paper failed. Re-pair from the pill and use Reprint; don't ring the sale again.
Parking a cart
Someone's forgotten their wallet and there's a queue behind them. Park (F8) sets the cart aside under a label of your choosing — the default is the time — and clears the screen for the next customer. Resume (F9) lists what's parked on this register and puts one back in the cart.
A parked cart is a convenience, not storage. Anything left parked for more than 24 hours is cleaned up automatically. Park across a lunch break, not across a week.
Refunds and returns
Refunds start from the receipt, not from the cart. You need the Refund / void permission — without it the button is greyed out.
- Recall the sale Click Refund in the top bar. Type or scan the receipt number from the printed receipt into Recall sale and click Look up.
- Say how much of it is coming back Every line of the original sale is listed with what was sold and at what price. Enter a return quantity per line — you can return one item off a ten-line receipt.
- Give a reason The reason is required; the refund button stays disabled until you've typed one. It's stored with the refund and printed on the refund slip.
- Refund Stock goes back on the shelf and the return is written into the movement history. Refunding part of a receipt leaves the sale marked completed with the refund noted against it; the sale only flips to refunded once every line has been returned in full.
Refunds are all-or-nothing per press: if any line can't be processed, nothing is. A second partial refund against the same receipt knows what's already been returned and won't let you over-refund.
Cash handling and end of shift
Everything to do with the drawer lives behind the drawer pill in the top bar. Click Close while a shift is open and you get:
- Pay in / Pay out — put a float top-up in, or take money out for petty cash or a safe drop. Enter the amount, then press the direction.
- X-report (read drawer) — a mid-shift read that tells you Expected in drawer right now, without closing anything. Use it before a safe drop or a handover.
- Counted cash — what's physically in the drawer at the end. Enter it and press Close drawer. The variance against expected cash is recorded, and that over/short is what you reconcile in person.
Z report (F10) is the shift's takings: counts of sales, voided and refunded receipts, subtotal, tax and gross, then a split by cash, card, mixed and other. Print it to the receipt printer before you count the drawer.
Z report first, then count the cash, then close the drawer. Reading the report after you've closed still works, but counting against a figure you printed beforehand is what makes a variance meaningful.
Who can do what
Opening the register screen needs access to the POS app. Individual actions need individual permissions on top, granted per role under Settings → Module Access. Admins pass everything.
| Permission | Unlocks |
|---|---|
| Sell (checkout) | Open and close the drawer, and complete a sale. Without it the Checkout button is disabled. |
| Refund / void | The Refund button — recalling a receipt and returning lines. |
| Receive stock | The Receive button on the register, plus the receiving screens. |
| Count / adjust | Count / Adjust, Stocktake and Import stock. |
| Transfer stock | Moving stock between warehouses. |
| Purchasing | Purchase orders and supplier returns. |
| Kitchen display | Opening the Kitchen screen and bumping tickets ready. Firing a guest's order from that screen needs Sell as well. |
A cashier granted only Sell can ring sales all day and cannot open Receive, Transfer or Purchasing at all. The buttons are hidden or disabled in the app and the server refuses the action, so there's no way round it by URL. Background on the two permission systems is in Permissions & access.
Permission to use the register is separate from permission to see the underlying records. Someone can be allowed to sell without being allowed to browse the Sales or Products tables — set both deliberately.
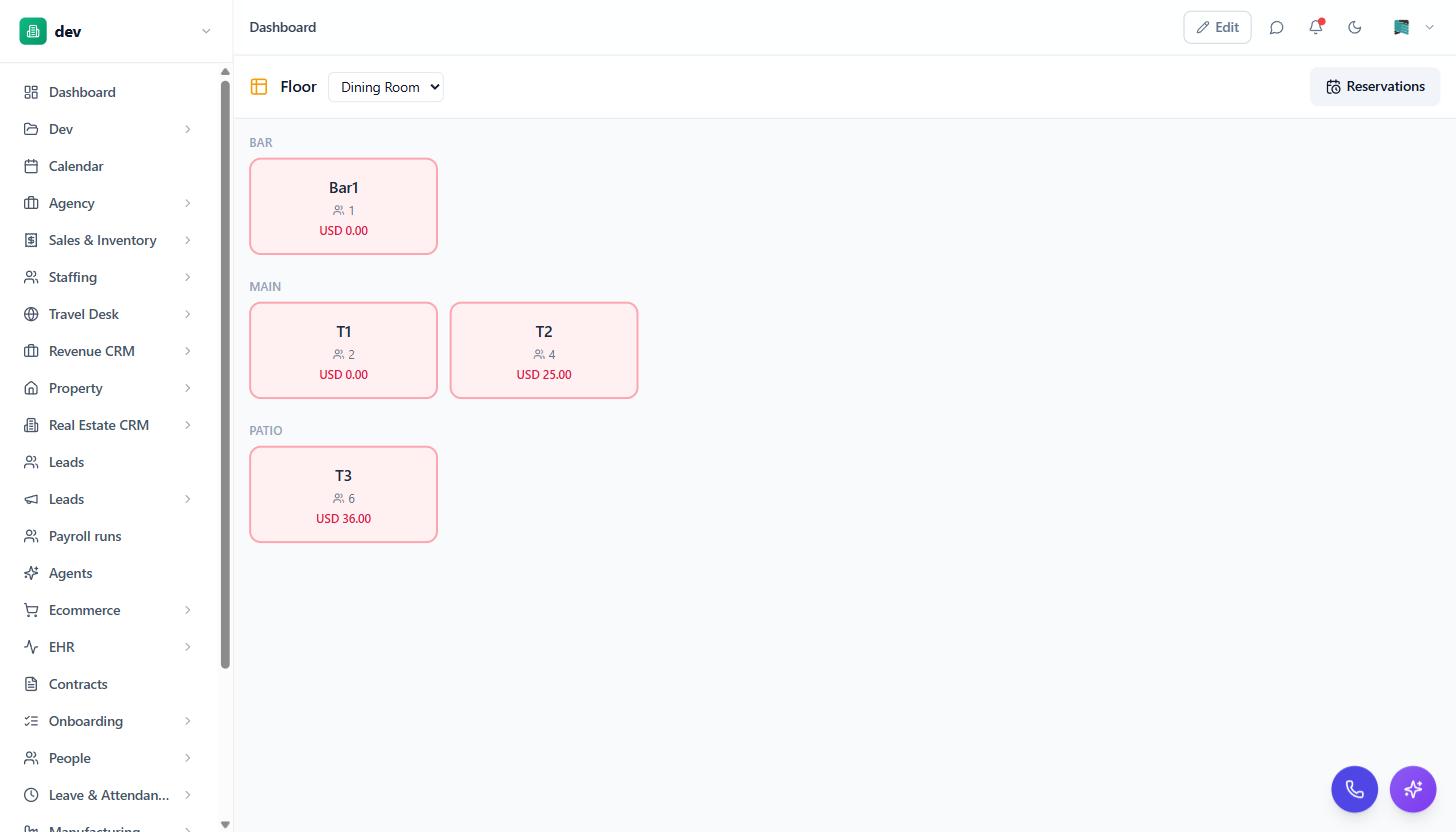
A register can run as a counter till or as a dining room. Set Mode on the register record to Restaurant (tables) and that terminal boots into a table floor instead of the retail cart. It's per register, so one venue can run a takeaway counter and a dining room on different terminals at once.
Underneath it's the same engine: settling a table rings a normal sale, relieves the same stock, uses the same costing and prints the same kind of receipt. Switching to restaurant mode also reveals the restaurant screens in the POS menu — Tables, Reservations, Menu & modifiers, Kitchen and Table QR codes. A retail-only workspace never sees them.
The floor
Tables are laid out by section as coloured tiles. A tile shows the table label, its seats, and — when a tab is running — the running total. A free table with a booking coming up shows the time and the guest's name. Tap a table to open or resume its tab.
Running a tab
- Seat the table Tap a free table. That opens its tab and marks the table seated. One open tab per table, always.
- Add to the order through the meal The tab screen puts the menu on one side and the running order on the other, with category tabs and a Search the menu box. Items with option groups open a picker — size, extras, how it's cooked — and the option prices fold into the line. Everything you add is saved as you go, so a tab survives a reload or a different terminal.
- Send to kitchen Send to kitchen fires the items that haven't gone yet, grouped by prep station, and prints a ticket per station. Fired lines dim with a tick. Press it again later in the meal and only the new items go — never a reprint of the whole order.
- Settle Settle shows the total due and takes Cash or Card. That rings the whole tab through as one sale — stock and receipt included — and frees the table.
Void throws the tab away and frees the table without recording a sale. It asks first, and there's nothing to recall afterwards — use it for a walkout or a mistake, not for a comp you want on the books.
Kitchen display
POS → Kitchen is the screen the kitchen or counter watches. Two lanes, oldest first:
- Dine-in — every table with something to make. Items still cooking sit here until someone presses Done, which clears the ticket. A guest's QR order lands badged NEW with a Fire button, so an order placed at the table reaches the kitchen without a server relaying it.
- Pickup — today's online pickup orders. Ready lights the customer order-number board and emails the customer.
Tickets carry the table, the covers, the station chips, quantities, chosen modifiers and any note. A timer ages each card so nothing sits forgotten. The screen refreshes itself — nobody needs to touch it. Customer board in the header opens the public "now serving" screen in a new tab, ready to cast onto a dining-room display.
Menu, modifiers and QR codes
POS → Menu & modifiers is where option groups are authored. Pick a product, Add group (name it Size, Extras, Doneness…), choose Pick one or Pick any, mark it Required if the order can't proceed without a choice, then add options with a Price ± each. Saved groups appear at the register the moment the item is added to a tab.
POS → Table QR codes prints a sheet: one QR per table that opens your menu for that table, plus a venue QR that opens your storefront. Print sheet and cut them up. Orders guests place from the table arrive on the tab and show on the Kitchen screen as NEW for a server to fire.
Selling the same catalog online is the Online store app, which shares this inventory.
When something goes wrong
| What you see | What it means |
|---|---|
| No registers yet | Nothing to sell from. Create a register and bind it to a warehouse. |
| Insufficient stock for "…". On hand: n, requested: n | The shelf is short. Either the count is wrong — see Stock & warehouse — or you genuinely can't sell it. A register can be set to Allow overselling if you want to sell into a negative balance. |
| A product has no price the cashier can read | The Products entity needs a currency field named Price, filled in on that product. |
| No product with barcode "…" | The scanned code isn't on any product's Barcode field. Add it to the product record. |
| Register has no warehouse assigned | Checkout can't decrement stock without one. Set the register's Warehouse. |
| POS hit an unexpected error | The page crashed, not your data. Try again or Reload page. Sales already completed were committed before the crash and are safe; a cart in progress wasn't sold, so rebuild it. |
Checkout is committed on the server, not in the browser. If the connection drops mid-shift, the sale in front of you cannot be completed until it's back — take the payment on paper and ring it afterwards rather than assuming it queued.
What sales do to the rest of your workspace
- Stock comes off the register's warehouse at the moment of sale, and goes back on a refund. Every one of those movements is logged — Stock & warehouse.
- Accounting can post each completed sale to the ledger automatically, with the cost of goods sold valued by your chosen costing method — Accounting.
- Made-to-order items can pull their ingredients or components out of stock as they sell — Manufacturing.
- Restocking is the purchasing side: raise an order, receive the delivery, return what's faulty — Purchasing & suppliers.